Skip to content
Whisky and Velvet Whisky and Velvet

Sewing, pattern design, and more!

  • Home
  • Contact
  • About
Whisky and Velvet
Whisky and Velvet

Sewing, pattern design, and more!

Tag: fitting

Project Updates A woman standing in a kitchen, one hand on her hip. She is wearing a gold, knee-length silk dress with a sweetheart neckline and princess seams.

A Little Gold Birthday Dress

Posted on June 12, 2025June 10, 2025

In the online sewing community, you’ll often find folks talking about special fabrics — those that are too good to cut in to. These fabrics sit in fabric stashes for years, waiting for the perfect project, if one can ever be found. For me, that special fabric was a gorgeous crepe-backed gold silk satin from Mood Fabrics. I purchased it in 2019 using a gift card that my in-laws had gotten me for Christmas. Then it sat in my stash for six years, untouched. I made countless excuses not to use this beautiful fabric. I couldn’t find the right pattern. The event wasn’t important enough. I didn’t have the necessary skills to do it justice.

In some ways, that last one is true. In the end, I am glad that I waited to use my fabric. But, at the same time, I’m also happy that I finally made the decision to use it.

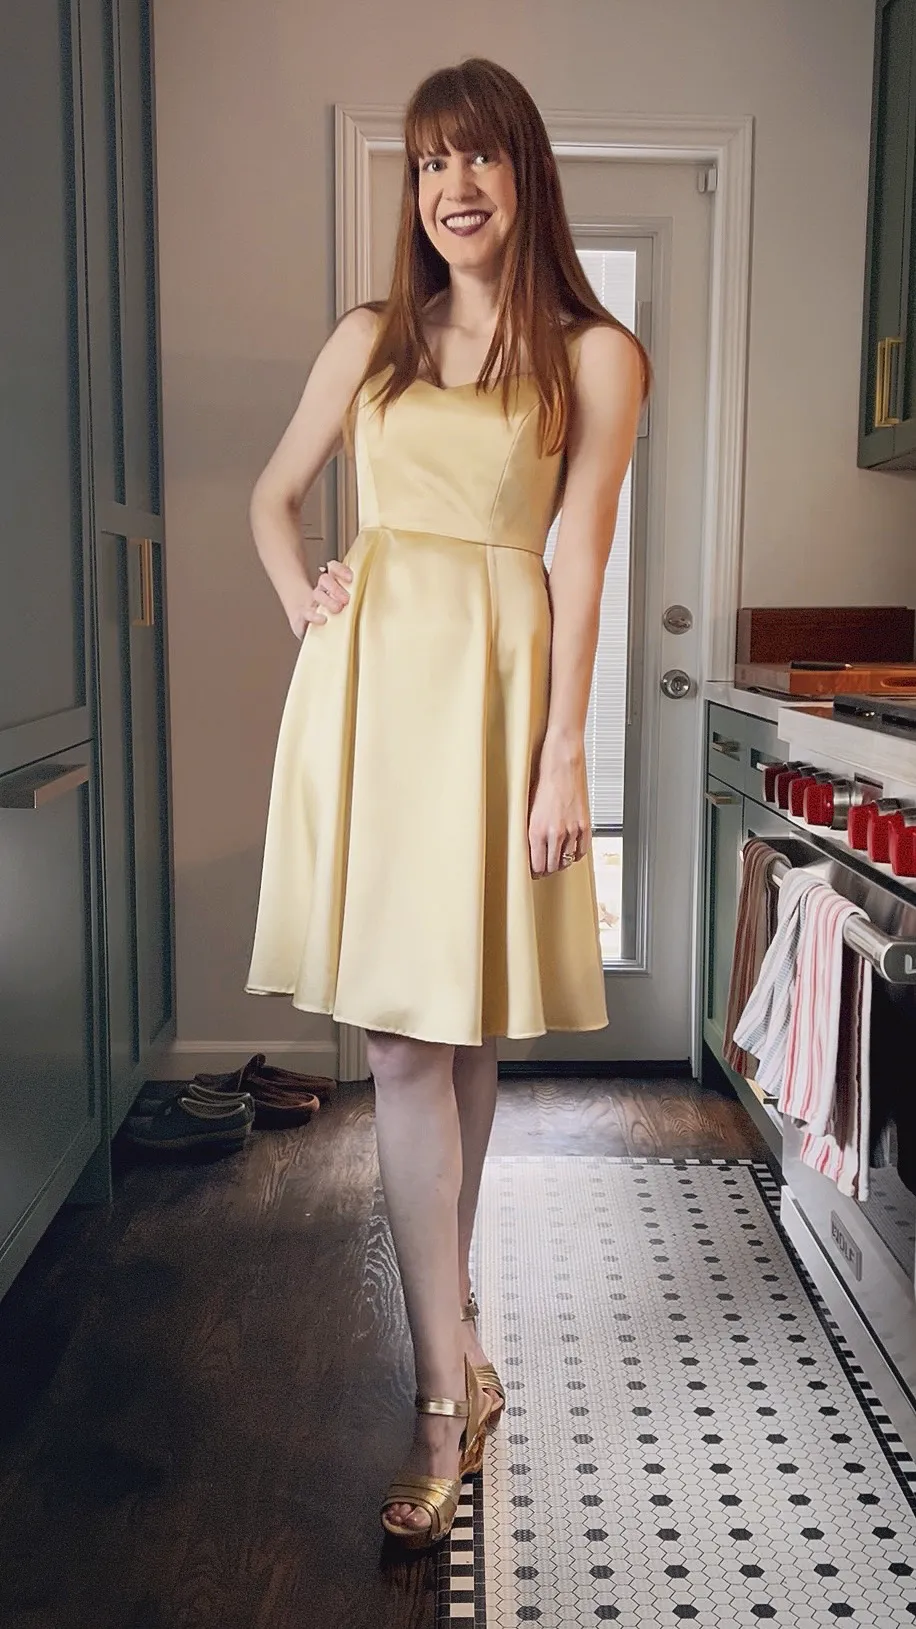
I finally decided to use this fabric to make a special dress for my 40th birthday. A milestone year called for something special. A good friend of mine is a member at The Magic Castle in Los Angeles, and she was able to get me a reservation for a small group on a Saturday night. If you’re unfamiliar with The Magic Castle, it’s an exclusive private club in Los Angeles that’s accessible only to members of the Academy of Magical Arts and their guests. The Magic Castle has a strict dress code — everyone who enters must dress in appropriate evening attire. As you can imagine, such a special evening required an equally special dress!

The Perfect Pattern

I’d settled on the event and the fabric — next I needed to find the right pattern. At first, I considered drafting my own dress. I also looked at options from Charm Patterns and Cashmerette. Nothing I imagined felt quite right. Then, Cashmerette released their club pattern, the Mansfield Dress, in December 1 of last year. I took one look at that gorgeous sweetheart neckline and new I’d found my pattern.

The First Toile

I prefer princess seams to darts, so I opted to mix elements of the Mansfield pattern with the Upton pattern. For my first toile, I used the back pattern pieces from the Mansfield and the front pieces from the Upton. I modified the center front to use Mansfield’s sweetheart neckline and eliminated the waistband. Then, I altered the back pieces to use a center back zipper, rather than the Mansfield’s side zip. I cut out the pattern in a size 2, grading down to a size 0 at the waist.

Front view of my first Upton/Mansfield dress muslin. The bodice fits very loosely around the chest and side seams.
Side view of my first Upton/Mansfield dress muslin. The bodice fits very loosely around the chest and side seams.
Back view of my first Upton/Mansfield dress muslin. The bodice fits very loosely around the side seams, and the back armholes are gaping.

Above, you can see the fit of my first toile. Overall, the fit was too loose, and there was a lot of gaping along the back armholes. I adjusted the toile by removing a 1/4″ wedge out of the back armband and a 1/2″ out from the side seams.

Front view of my second Upton/Mansfield bodice muslin. The fit is much better overall.
Side view of my second Upton/Mansfield bodice muslin. The fit is much better overall.
Back view of my second Upton/Mansfield bodice muslin. The fit is not great, and the armbands are too far to the sides.
Side view of my second Upton/Mansfield bodice muslin. The fit is much better overall. I have lifted my arm in this photo, so you can see where I have taken in the back arm gaping.

These four images are the same toile with the aforementioned adjustments. The fit is much improved, but I still wasn’t happy with the shape of the back.

The Second Toile

At this point, I decided to use the Upton back pieces instead of the Mansfield back. I added length to match the front pieces and copied the square back neckline. I also moved the shoulder straps in by about 1/4″ to better cover my bra straps.

Front view of my third and final Upton/Mansfield bodice muslin. The fit is very nice!
Side view of my third and final Upton/Mansfield bodice muslin. My arm is lifted so that the side seam is visible. The fit is very nice!
Side view of my third and final Upton/Mansfield bodice muslin. The fit is very nice!
Back view of my third and final Upton/Mansfield bodice muslin, now with back princess seams. The fit is very nice!

Here are the results of my final toile! I was very happy with the fit at this point, and was ready to begin work on the dress. You may notice a little wrinkling in the princess seams in the above images. I had already decided that I would add boning to the bodice seams of the dress, so the wrinkling didn’t worry me, as I knew the boning would straighten that out.

Sewing it All Together

A photo of the back of a piece of gold-crepe back silk satin with a muslin pattern piece sitting on top. The muslin has been partially stitched by hand to the silk satin.
The front of a princess seam bodice piece, cut from gold silk satin. There are hand-sewn stitches around the perimeter, in the seam allowance area.

Once I had a well-fitting muslin, the dress came together painlessly. The silk crepe back satin fabric was, surprisingly, a joy to work with. I interlined the bodice pieces with muslin by hand before sewing them together, then lined the bodice with a lightweight cotton/silk lining. I sewed boning channels into the bodice princess seams, side seams, and about an inch away from the back center zipper, then inserted spiral steel boning into the channels to give the bodice structure. I’ve grown to love the extra touch of professionalism that boning gives to a fitted garment!

A selection of supplies sitting on a table in front of a Bernina sewing machine. The supplies consist of: gold thread, a zipper, sewing machine needles, spiral steel boning, clear elastic, clear buttons, and pants hooks.
An in-progress photo of gold silk bodice and lining pieces partially assembled.
A gold silk bodice, lined and boned, draped on a dressform.
A bodice turned inside out, draped on a dressform, so that the lining and boning channel stitches are visible.

To make this garment even more special, I took the time to finish the lining and hem by hand. I stitched a tiny hand-rolled hem, which I think looks really beautiful in this fabric. And as a final touch, I hand-sewed a waist stay to the internal waistband seam.

I’m absolutely thrilled with this dress, and I’m happy that I took my time to make it truly special. It was a beautiful gown to wear to celebrate my 40th decade. I can’t wait to wear it again for more special occasions in the future!

A woman standing in front of a curtain, her hands folded in front of her. She is wearing a gold, knee-length silk dress with a sweetheart neckline and princess seams.
A close-up of a woman standing in front of a curtain, her hands clasped behind her. She is wearing a gold, knee-length silk dress with a sweetheart neckline and princess seams.
A woman standing in front of a curtain. She is wearing a gold, knee-length silk dress with a sweetheart neckline and princess seams. She is holding up the skirt with one hand to show off the lovely drape of the fabric.
A woman standing in front of a curtain, facing away from camera. She is wearing a gold, knee-length silk dress with a neat square neckline and princess seams.
Thoughts A stock image of a variety of colorful sewing tools.

Project Diary: The Beginning

Posted on August 16, 2023May 20, 2025

Ramblings about the fitting process

I have delayed starting this newsletter for a long time, unsure how to actually begin. Luckily, I was inspired by a recent opinion piece in the New York Times that has been making the rounds in the sewing community this week: Your Clothes Were Never Meant to Fit You by Elizabeth Endicott.

I’ve been thinking quite a lot about fitting recently — it’s the primary reason why I began the process of creating my dress block. One of the most important lesson I’ve learned through this process, as well as from years of making my own bras, is how very nuanced and unique fitting is to each individual. It’s not as simple as a collection of measurements, because two individuals with the exact same measurements could have those measurements distributed very differently on their bodies.

I see this often in bra sewing. I wear a UK size 32GG, and yet I cannot wear a good portion of ready-to-wear bras in this size. This is because the size itself, 32GG, refers only to the underbust circumference and full bust circumference of a bra. But there’s a lot more to getting a correct fit — underwire size and breast tissue distribution (which impacts cup volume) are huge factors.

I ran into similar concerns when creating my dress block. I made twelve different versions of the bodice block in order to get a fit I was happy with, and even so, it doesn’t fit me perfectly (though I think the pursuit of perfect fit is impractical, given how often our bodies fluctuate in size). What struck me most was how even the subtlest changes to seam lines and dart points had a sizable effect on fit.

All of this is to say that, yes, it makes sense that mass-produced ready-to-wear clothing isn’t, and frankly can’t be, designed to fit the majority of people. But sewing patterns, even with their expanded size ranges, also have limitations. They’re still built off of a pre-determined base shape. For many, myself included, adjustments are still necessary.

I often see pattern reviews posted on Instagram that include a line along the lines of “this pattern fit me perfectly, with no adjustments!” as though this is a marker of a well-made pattern. In fact, all this means is that the reviewer’s body happens to be very similar to the block that the pattern was based on (or, perhaps, they are not as bothered by small fitting issues as I am). What disturbs me about this sentiment is it promotes the same wrong idea that the ready-to-wear industry has been pushing on us for decades: that we should be striving to fit into a mold.

But the beauty of learning to sew our own clothes is that we don’t have to fit into a mold. We don’t have to wear what everyone else is wearing, and we can make any adjustments we please — be they for aesthetic reasons, fitting reasons, comfort reasons, you name it. We don’t even have to use a pattern. This is why I’m so interested in learning to draft clothing for myself — so that I can really discover my own sense of style, free of what the rest of the world tells me I should wear.

Thanks for joining me on this journey. In the future, I’m planning to share more details on my making process, and not so much stream-of-consciousness posts like this one. These thoughts have been swimming around in my mind recently, and it helps to write them out here. What about you, reader? I’d love to know if any of this resonates, or if you have other thoughts on what you’ve learned while sewing and fitting your own garments. Leave a comment and let me know!

Categories

  • Halloween Costumes
  • Pattern Drafting
  • Project Updates
  • Sewing Room
  • Thoughts
©2025 Whisky and Velvet | WordPress Theme by SuperbThemes